
In this lesson 4 of our Azure Data Factory Tutorial for beginners series, I will take you through how to create linked service in the ADF. I will also take you through step by step processes creating the Linked Service using the Azure Data factory studio and through ARM template. We will also see in detailed what are the scenarios in which linked service should be used, why we should use the linked service in adf. Besides these I also share my own experience of creating the linked service in the most efficient way. In case you haven’t gone through my first Lesson 1 of Azure Data Factory tutorial, I would highly recommend to start from lesson 1 to understand the Azure Data factory from scratch develop your concepts since start. Let’s dive into the tutorial now.
- Lesson 1: Azure Data Factory Concepts
- Lesson 2: Azure Data Factory Studio Overview
- Lesson 3: Azure Data Factory Create Your First Pipeline
- Lesson 4: ADF Linked Service In Detailed
- Lesson 5: Azure Data Factory – Copy Pipeline
- Lesson 6: Add Dynamic Content- Expression Builder
What is the Linked Service In Azure Data Factory
Linked service in Azure Data Factory is the connection mechanism to connect to the external source outside the ADF. It works as the connection string to hold the user authentication information.
For example assume that you have to move the data from Azure SQL database to the Azure blob storage. In this case we need a connection to the source that is Azure SQL database and connection for destination that is Azure blob storage
Therefore in this case we have to create two linked services:
- For connecting to Azure SQL Database
- For connect to Azure blob storage
When you need to use Linked Service in Linked Service
In almost all the activities you need to use the link service. Basically as we discussed Linked Services used to make a connection towards your data source. So if you are using any copy activity you have to use the linked service.
Even if the cases where you are using the dispatch activities like as Azure function activity Databricks activity, which is calling the services outside the adf also needed a linked service to make a connection.
How to create linked service for Azure Blob Storage
Prerequisite
- You need Azure data factory account (Incase you don’t go to the lesson 1 to see how to create first Azure Data Factory account).
- Permission to create linked service
- Azure blob storage account
Steps to create Linked Service
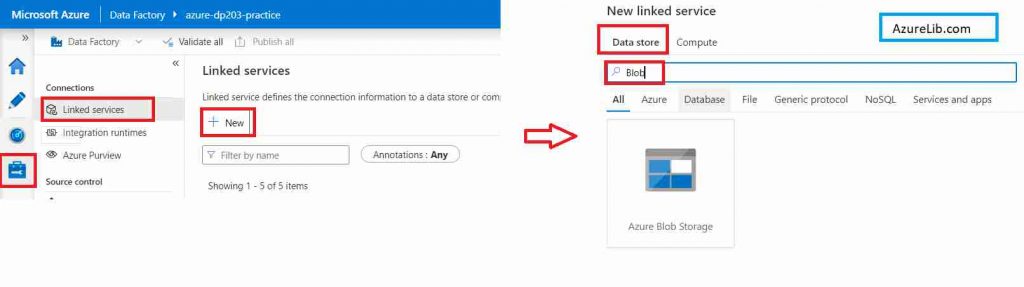
- Select the Azure data factory account and go to Azure data factory studio
- Now click on the manage tab Here you will get an option to create the link service just click on the new
- Once you click on the new, you will be greeted with a linked service blade. You have to search for the type of data source which you want to connect. Whether you want to connect to a data source or maybe you want to connect to some compute option. For example in our case we want to connect to the Azure blob storage which is a data source, hence it will be available under the data tab (you can see the image below highlighted with red square).
- You can type azure blob storage and you will see in the bottom. Just select it and you will move to another screen where you need to provide all the details about the linked service which you want to create.
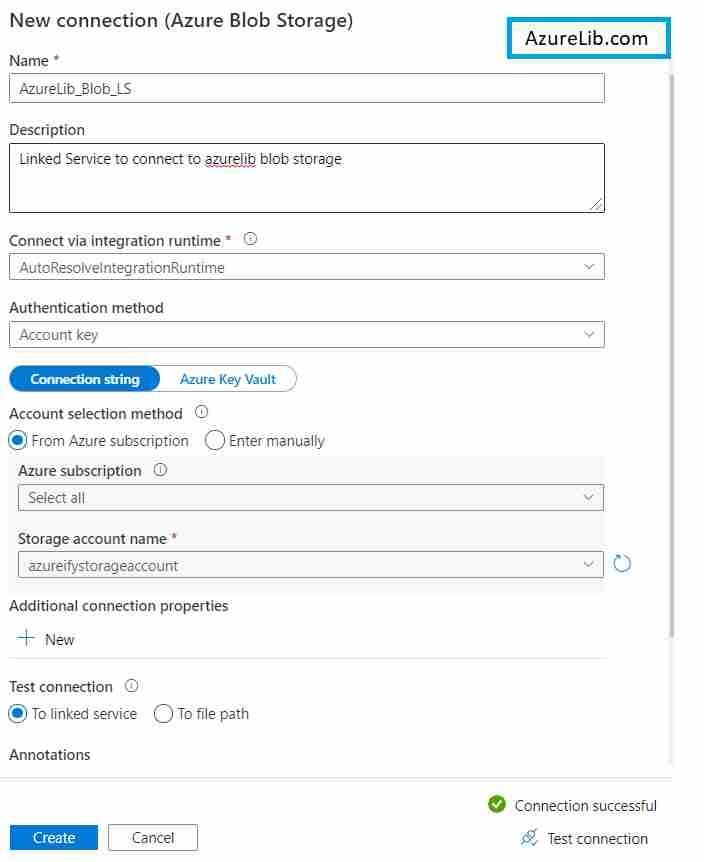
- It will ask the following details to create the linked service.
| Name | You need to provide the name which is easy to understand and can correlate with the data source it is connecting. |
| Description | It is an optional field, you can provide description as per your business need. |
| Connect via integration runtime | It provides the compute resource through which you can connect to your data source. By default for Azure blob storage it will come as an ‘auto resolve integration runtime’ for now you can keep it default. |
| Authentication method | Here you can choose account key is authentication method |
| Account selection method | This section will ask you to provide the storage location which you want to connect to. So you have to select your subscription and based upon your subscription all the storage accounts associated with it are automatically populated in the dropdown. You can choose the required one from that. |
- You are almost ready with your linked service to work. Just click on the test connection to check whether it is connecting to the required data source properly or not. If everything has gone fine so far then your test connection would come out to be successful.
- Once test connection become successful, you have to just click on the create and Congratulation you have created your first linked service in the Azure data factory
Image 2
How to create linked service for Azure SQL Database
Prerequisite
- You need Azure data factory account (Incase you don’t go to the lesson 1 to see how to create first Azure Data Factory account).
- Permission to create linked service
- Azure SQL DB
Steps to create Linked Service for Azure SQL DB
- Select the Azure data factory account and go to Azure data factory studio
- Now click on the manage tab Here you will get an option to create the link service just click on the new
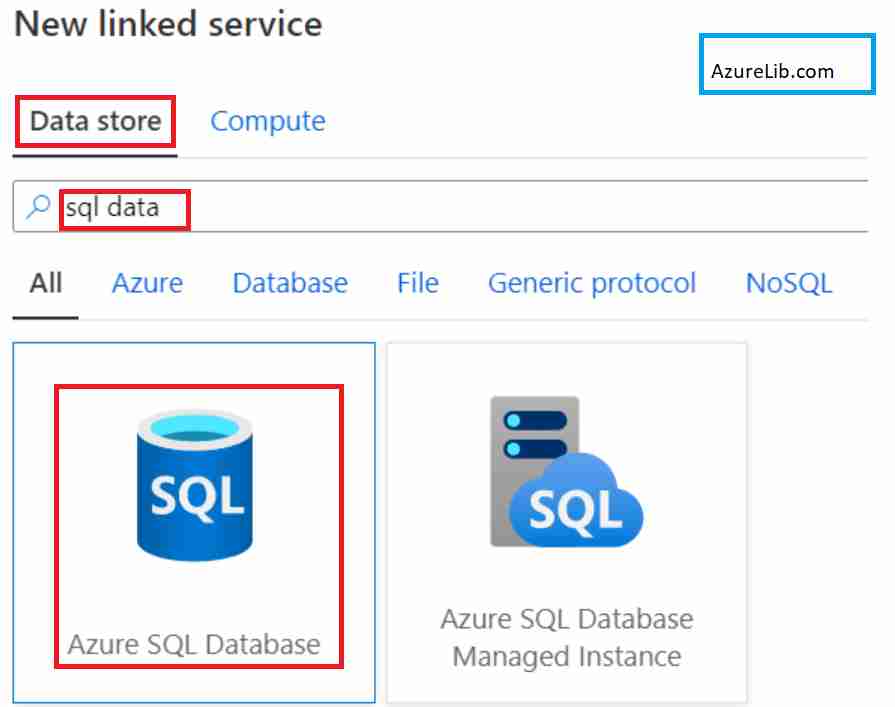
- Once you click on the new, you will be greeted with a linked service blade. You have to search for the type of data source which you want to connect. Whether you want to connect to a data source or maybe you want to connect to some compute option. For example in our case we want to connect to the Azure SQL DB which is a data source, hence it will be available under the data tab (you can see the image below highlighted with red square).
- You can type azure sql db and you will see in the bottom. Just select it and you will move to another screen where you need to provide all the details about the linked service which you want to create.
image 3
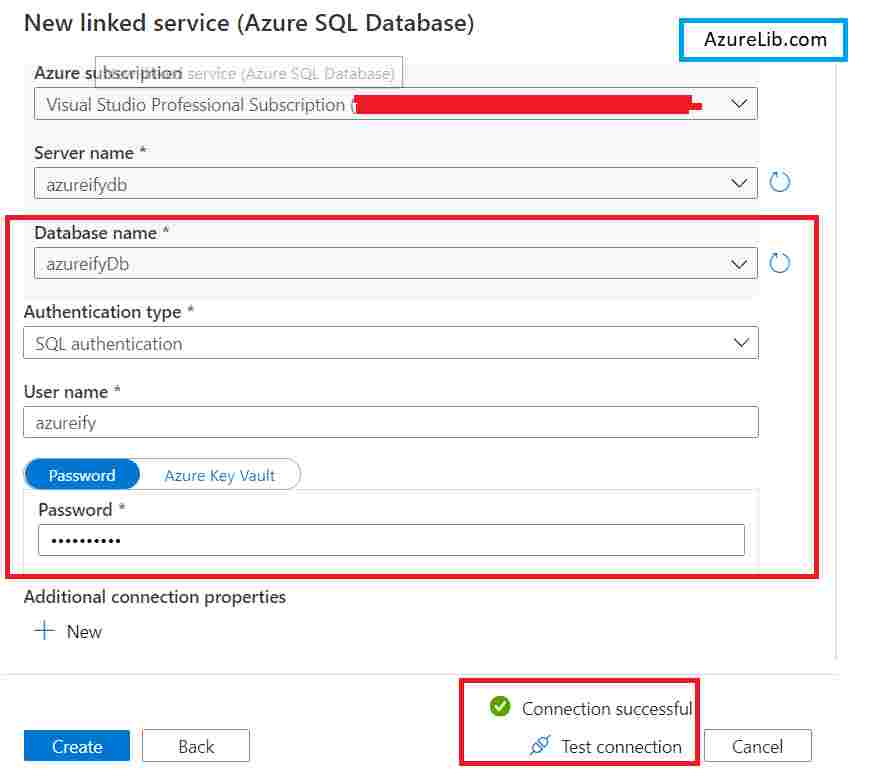
- Provide all the basic information like name of the linked service, description. As we are connecting to Azure SQL DB hence we use the autoresolveintegrationruntime which is selected by default.
- In the Account selection method select your subscription and you will get list of all available sql db under the drop down. Select the correct DB which you want to connect.
- Three are three ways to connect, one is managed identity, service principal and third one is simple sql authentication. In production environment SQL authentication is used for connecting to external data source outside the group.
- If you don’t have Azure active directory enabled in your account, then you can choose simple sql authentication, in this you will enter your database username and password. Click test connection to check all is good.
What are the Different ways to create Linked Service
- One most common way is through the Azure Portal itself which we have seen in above section. You can initiate the linked service creation from the manage tab. You can also create the linked service from the dataset as well. When you create the dataset there are also you get option to create the linked service.
- Another way is to create the linked service from the Azure ARM template. You can create the ARM template and can import it. This will create the linked service as well.
How to list all the linked service available in the Azure Data factory account
1. Go the manage Tab in Azure Data Factory.
2. Click on the linked service in the left hand side menu.
3. You will see all the linked service in the right hand side pane.
How to find list of data set associated with Linked Service
1. Go the manage Tab in Azure Data Factory.
2. Click on the linked service in the left hand side menu.
3. You will see all the linked service in the right hand side pane. ‘Related‘ column show all the dataset associated with it.
Microsoft Official Documentation for Azure data factory link
How to delete the Linked Service in Azure Data Factory
1. Go the manage Tab in Azure Data Factory.
2. Click on the linked service in the left hand side menu.
3. You will see all the linked service in the right hand side pane.
4. Hover around the linked service you want to delete, you will see the delete icon click and confirm.
This will delete the linked service which you have created.
Final Thoughts
By this we have reached the last section of our Lesson 4 of Azure data factory tutorial for beginners. In this lesson we have seen what is the linked service and how to create our first linked service for azure blob storage and Azure SQL DB. I have also shown you setp by step method to create the variety of linked service.
In the next lesson we will go deeper into the Azure Data factory Dataset and learn new concepts with some exciting practical.
Please share your feedback and your comments. In case you have any questions or query please drop them in the comment box below and I will try to answer them as early as possible.
- For Azure Study material Join Telegram group : Telegram group link:
- Azure Jobs and other updates Follow me on LinkedIn: Azure Updates on LinkedIn
- Azure Tutorial Videos: Videos Link
