
Are you looking to learn how to use the get method activity in the Azure data factory or maybe you are looking for how to get the last modified date for a file that exists in your blob storage. Or you are wondering how to get the list of file names or folder names from the Azure blob storage. In some cases you might also be looking for how you can get the size of a file or you want to identify the md5 of the file available in the Azure blob storage.
Besides the blob storage metadata you may be looking to get some metadata info about your tables in relational database like you want to check how you can get the list of the columns from a table or maybe you are asked to identify the count of the number of columns in a table from the database. Surprisingly you wanted to do these kinds of operations using the Azure data factory. In this article I will take you through the step-by-step process with an explanation on how you can use the get method activity to achieve all the above mentioned functionalities. Let’s begin our tutorial for getmetadata activity in adf.
How to get the list of the files or folders from a specific location in Azure blob storage?
- Go to the data factory and create one pipeline. I am giving the name as getmetadata-demo-1, you can give the name as per your choice or you can use any existing pipeline if you have available in your data factory account.
- Create a linked service which will point to the Azure blob storage location. In case you don’t know how to create the linked service in ADF then please follow this tutorial to create the line service for ADLS. Link
- Create a dataset for Azure blob storage using the linked service created in above steps. In case if you have any difficulty in creating the dataset for blob storage then you can follow this link to create data set for blob storage. Link
- Go to the activity search box and type getmetadata. In the results section you will see getmetadata activity. Drag and drop this activity into the pipeline designer tab.
- Select getmetadata activity and go to the dataset tab. Under the dataset tab you will see the field dataset there select the dataset which we have created in above step to connect to the Azure blob storage.
- Scroll down and there you will see the attribute field list. In front of it you will see a plus sign click on it. Drop down box will appear, in this drop down box you will see multiple properties. Here for now just select the child items as we wanted to select all the list of file names and folder names available inside the folder location. Hence just select the child items. This will return the list of all the folders and files available inside our pointed location along with their type.

- Our pipeline is now ready to run. Just go to the debug tab and click on the debug. This will execute the pipeline. It will take a few seconds based on the size of your folder and after that at the bottom pane you will see that your activity has been completed successfully.
Click on the output of the getmetadata activity. There you will see the output JSON with the property child items and in this child items you will see an array of file and folder names along with their type. For files you will see the type is file and for the folder you will see the type as folder.
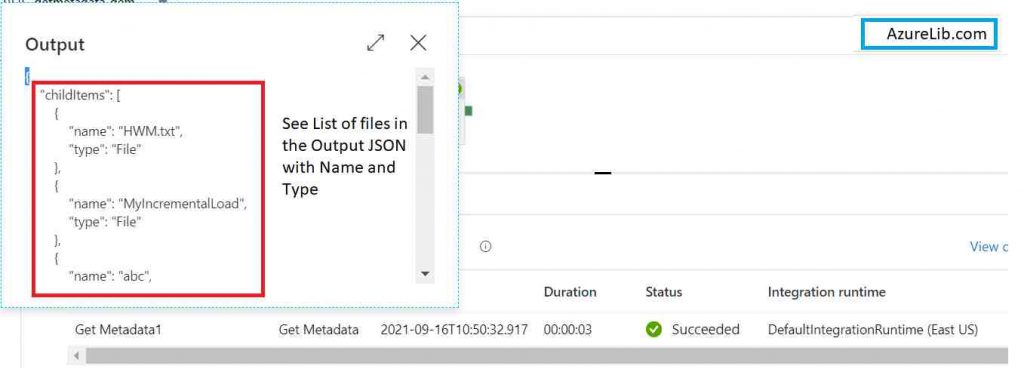
Congratulations!! You have created a pipeline with getmetadata activity which will pull list of all the files and folder names available in the Azure blob storage folder location.
How to iterate over list of files available inside folder in Azure storage location?
- For getting the list of the files and folder names available in the blob storage location please see the above section to pull out all the file names.
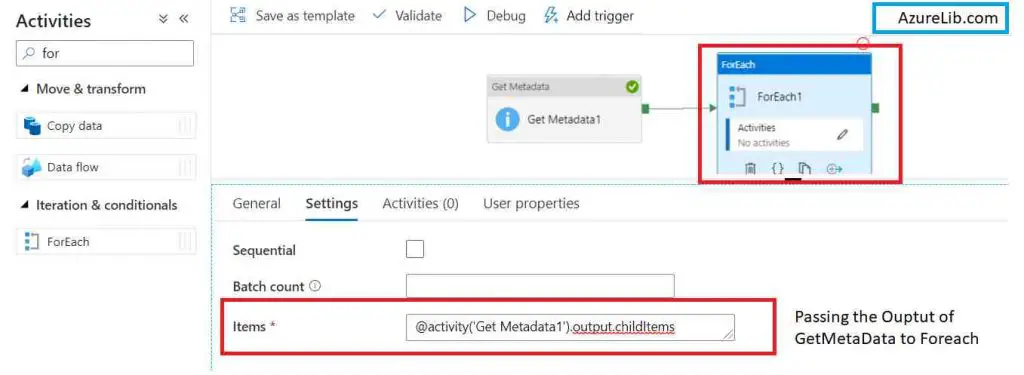
- For iterating over the file names you have to use the foreach activity. So let’s connect the output of getmetadata activity to the input of foreach activity. There you can iterate over the getmetadata output which contains array of files names.
- Under the foreach activity setting tab you will see items field. In the items field provide the output of the getmetadata activity. This will be the array of filenames over which you want to iterate.
- Now as per your business requirement or business logic whatever you wanted to do on this list of files and folders, add the activities like lookup, copy, if activity or any other suitable activity inside the foreach activity.
How to get the last modified date of a file or a folder using Azure data factory?
Sometimes before taking any action you want to know the last updated timestamp of a specific file or a folder. In this case you may be looking at what would be the activity in Azure data factory which could help you to solve this problem.
The answer is getmetadata activity. Let’s see how you can get the last modified date of a file using getmetadata activity with an example.
- Go to the factory and create one pipeline. I am giving the name as getmetadata-3 demo-3. You can choose the name as per your need or maybe you can use the existing pipeline available in your Azure data factory account.
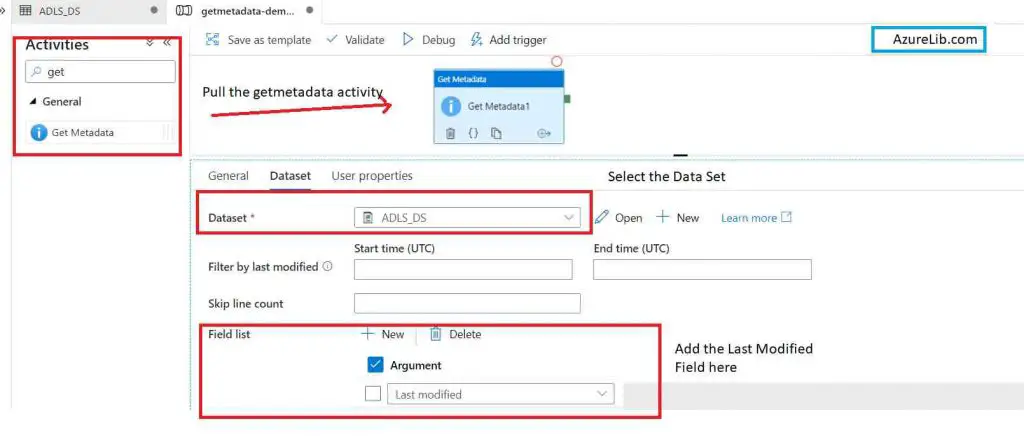
- Go to the search box and search for get metadata in the result pane you will be able to see the getmetadata activity. You have to pull this activity and drop it into the pipeline designer tab of adf.
- Now select the getmetadata activity. In the bottom pane you will see the multiple tabs like general, dataset and few more. Out of that click on the dataset tab.
- Under the dataset tab you will select the dataset. Here you will select the blob storage dataset where your folder is available for which you wanted to identify the last modified timestamp. n case if you’re not aware of how to create the dataset and the linked service please follow the link to create a dataset and the linked services.
- Under the dataset tab you will see another property with name field list. In front of this property you will see a plus sign click on thispPlus sign and add the property.
- Select the last modified date property from the dropdown.
- As in this case we want to get the last modified date of a file or folder that’s why we have selected the property last modified date which will pull out the last updated timestamp for a file or a folder.
- Our pipeline is almost ready to run. Just go to the debug tab and click on the debug. It will execute the pipeline for our demo purpose, we have just added one activity. This will show getmetadata activity output under the output tab.
Go to the output tab and open the output for getmetadata activity. You will see the JSON and here you can see that the last modified date property is giving you the last modified timestamp for your files or folder which you have selected in the dataset.
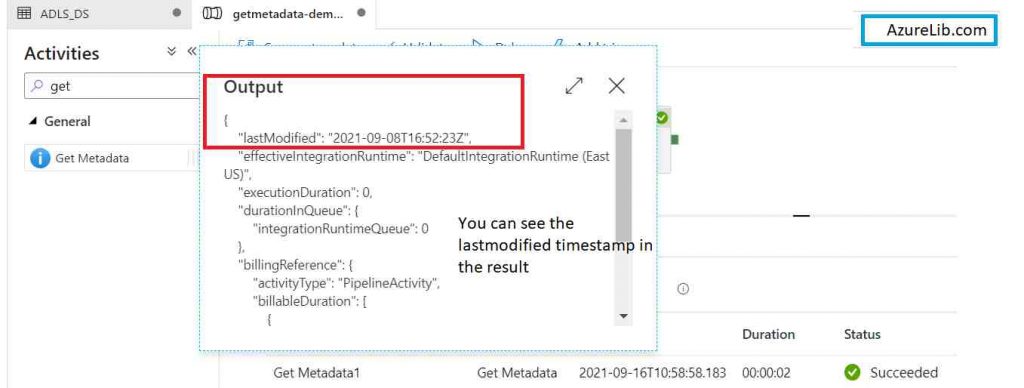
Congratulations!! you have created a pipeline with getmetadata activity to get the last modified date of a file or folder.
Now maybe you want to add some more activity to take further action based on the lastmodified date timestamp. You would like to add the if activity or foreach activity or some other custom activity to continue your work based on the timestamp.
How to get the size of a file in Azure data factory?
There could be a situation where you wanted to check, what is the size of a file in adf before you wanted to take any further action. I will explain to you, how you can get the size of a file in adf using these step by step methods.
- Go to the Azure factory account and create a pipeline. I am giving the pipeline name as getmetadata- demo-3. You can choose the name as per your choice or maybe you can use any existing pipeline available in your account.
- Create a dataset which will point to the file for which we wanted to get the size. In case if you are not aware of on how to create the dataset and linked service please follow the link to create the dataset for blob storage or ADLS
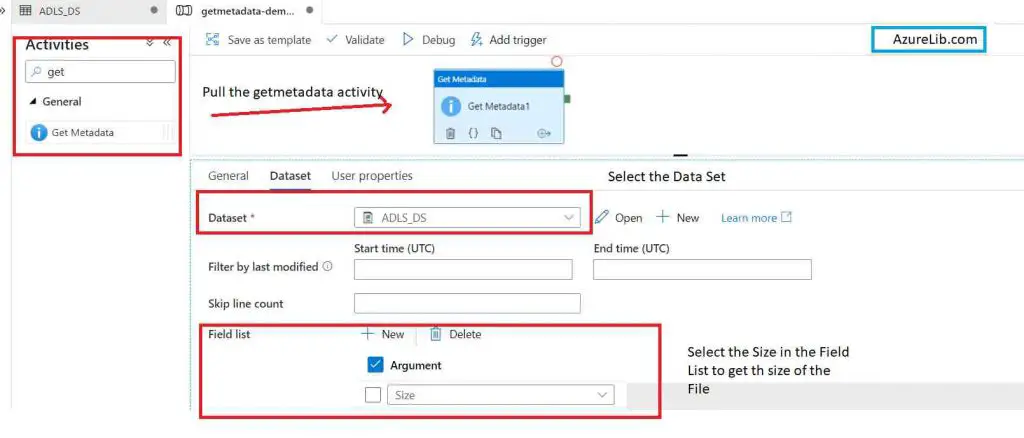
- Go to the search box and search for getmetadata. When the result appear you will be able to see the getmetadata activity. You have to pull this activity and drop it into the pipeline designer tab of adf.
- Now select the getmetadata activity, in the bottom pane you will see the multiple tabs like general, dataset, etc. Out of that click on the dataset tab.
- In the dataset frame that is pointing to the file location for which we wanted to check the size.
In the bottom you will see the field list property just click on the Plus sign and you will see a dropdown. On the dropdown please select the size attribute.This attribute will actually give you the size of the file which is pointed by the attached data set.
- Now our pipeline is ready to run. Just go to the debug and click on debug. This will execute your pipeline. Once the pipeline gets executed go to the output tab under the output tab you will see the getmetadata activity execution Run.
- Click on the output of the getmetadata execution and you will see the output JSON. In the output JSON you will see the property name size and in front of the size you can see the size of a file in the bytes.
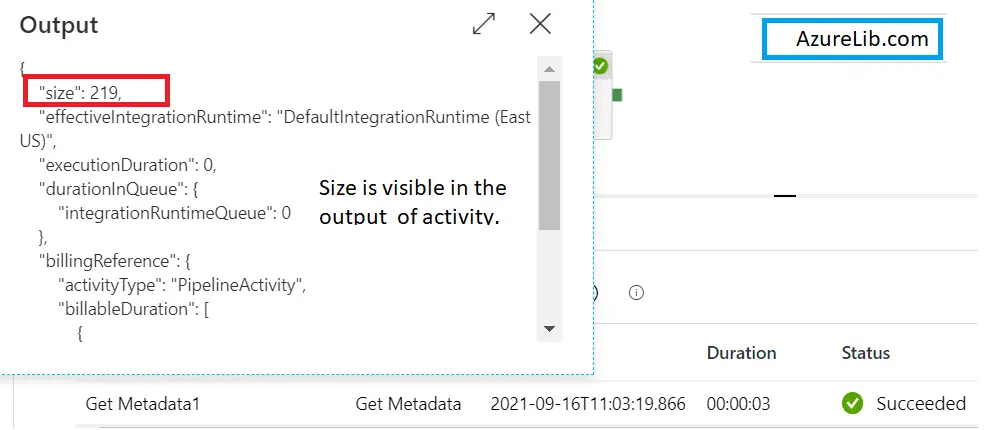
Congratulations!! you have successfully get the size of the file in the Azure data factory.
Now you may want to add some more activity to solve your business logic. Based on the size you want to take some action hence accordingly you can add activities like if activity switch activity or other relevant activity.
How to get the size of a folder in the Azure data factory?
In Azure data factory getmetadata activity doesn’t support to get the size of a folder. Using the getmetadata activity you can only get the size of a file but you cannot get the size of a folder.
Workaround could be, you have to get the size of all the files and then you can add up the size to get the size of the folder.
Microsoft Azure Data Factory Get Meta Data Activity Official Documentation Link
How to get the MD5 of a file in ADF?
Go to the Azure data factory account and create a pipeline. I am giving the pipeline name as getmetadata- demo-4. You can choose the name as per your choice or maybe you can use any existing pipeline available in your account.
Create a dataset which will point to the file for which we wanted to get the size. In case if you are not aware of on how to create the dataset and linked service please follow the link to create the dataset for blob storage or ADLS
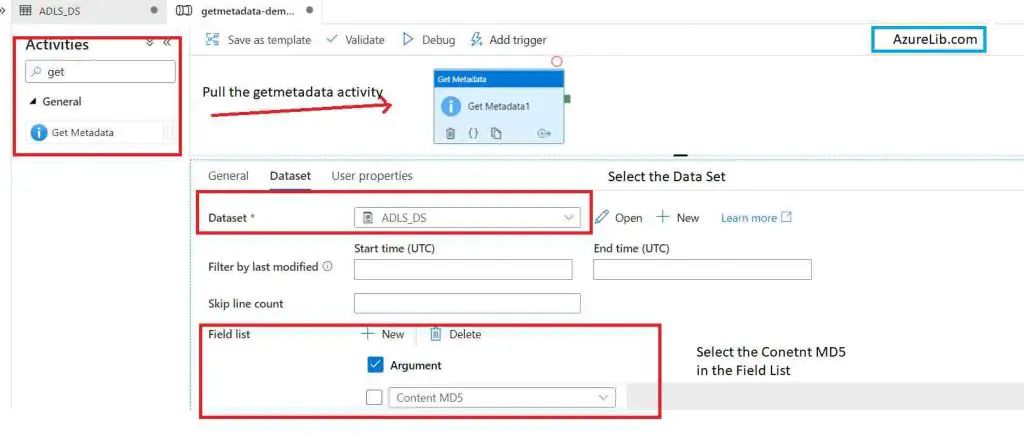
Go to the search box and search for getmetadata. When the result appear you will be able to see the getmetadata activity. You have to pull this activity and drop it into the pipeline designer tab of adf.
Now select the getmetadata activity, in the bottom pane you will see the multiple tabs like general, dataset, etc. Out of that click on the dataset tab.
In the dataset frame that is pointing to the file location for which we wanted to check the size.
In the bottom you will see the field list property just click on the Plus sign and you will see a dropdown. On the dropdown please select the MD5 attribute. This attribute will actually give you the MD5of the file which is pointed by the attached data set.
Now our pipeline is ready to run. Just go to the debug and click on debug. This will execute your pipeline. Once the pipeline gets executed go to the output tab under the output tab you will see the getmetadata activity execution Run.
Click on the output of the getmetadata execution and you will see the output JSON. In the output JSON you will see the property name MD5 and in front of it you can see the MD5 for the file.
Congratulations!! you have successfully get the content MD5 of the file in the Azure data factory.
Recommendations
Most of the Azure Data engineer finds it little difficult to understand the real world scenarios from the Azure Data engineer’s perspective and faces challenges in designing the complete Enterprise solution for it. Hence I would recommend you to go through these links to have some better understanding of the Azure Data factory.
Azure Data Engineer Real World scenarios
Azure Databricks Spark Tutorial for beginner to advance level
Latest Azure DevOps Interview Questions and Answers
You can also checkout and pinned this great Youtube channel for learning Azure Free by industry experts
Final Thoughts
By this we have reached to last section of this tutorial. In this tutorial we have learned how to use the getmetadata activity. We have also seen using the getmetadata activity how we can get list of files in folder, size of the file, lastmodified date of file or folder, and MD5 of file. Hope this has been exciting and insightful journey.
Please share your queries, comments and suggestion in the comment section. I will try to answer each one of them personally.
